This is Reason 25
Set any worksheet to default
You can now set any worksheet, custom or pre-made, as your home screen.
The home screen is the first one you see when you open a chart or create a new chart, like Worksheet 1 in PL 7 and 8. You can set any worksheet to be the default screen that gets opened when you enter new birthdata or open a chart from the file menu. This is very useful as you can select any of the preexisting screens that comes with the software as your home screen. You can set any worksheet to be the default screen that gets opened when you enter new birth data or open a chart from the file menu. This is very useful as you can select any of the preexisting screens that comes with the software as your home screen. This allows you to choose the worksheet that’s best for you, depending on your computer screen size and the charts you use most in your astrology practice. You can set any worksheet to be the default screen that gets opened when you enter new birthdata or open a chart from the file menu.
This is very useful as you can select any of the preexisting screens that comes with the software as your home screen.
The home screen can be changed as many times as you’d like, as your needs change.
How to use this feature:
1. Go to the Worksheet Properties menu by clicking on the worksheet title in the upper right hand corner.

2.Check the ‘Use as home screen’ box in the lower left.

Worksheet Properties Window
3. Press OK.
Related Useful Features:
If you had a worksheet set up in PL 7 that you really like and want to use it as a home screen in 8.5, you can import it in. Learn more here: Worksheet layout import


Worksheet layout import
If you’ve invested a lot of time into customizing worksheets in Parashara’s Light 7, and want to avoid repeating that work, you can transfer these worksheets directly into PL 9.
It can be done at any time, either at first install or at a later date.
Requirements: Parashara’s Light 7 must be installed in one of the following locations: C:/Geovision/PL7
D:/Geovision/PL7
The custom worksheet must have been given a name. To check if it has a name, go to the worksheet in PL 7. If the worksheet title has a number (example: 299. #299), the worksheet hasn’t been given a name. To give it a name, click on the worksheet title in the upper right hand corner.
The Worksheet Properties menu will pop up. Enter a new name in the Title text box and click OK. Close PL7 before importing the chart into PL9.
Limitations: Only the worksheet layout will be imported. Calculation changes, font changes, or anything else changed in the Options menu will need to be manually re-set.
Recommendations:
If you’ve only made minute changes to a worksheet, it will take the same amount of time to import as it will to make those simple adjustments.
This feature is of most use if you’ve spent significant time (over 10 minutes) creating a custom worksheet layout.
How to use this feature:
1. Navigate to the worksheet where you’d like to import your customized worksheet. This can be done by using the up and down arrow keys and selecting a worksheet under one of the toolbar menu icons or from the Charts drop down menu at the top. We suggest you use one of the empty worksheets entitled “unused” – but any worksheet will work.
2. Go to the Worksheet Properties menu by clicking on the worksheet title in the upper right hand corner.
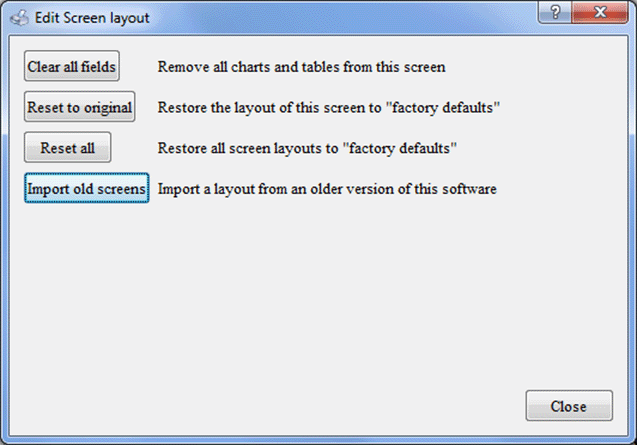
3. On the Worksheet Properties menu, click the button entitled “Restore/clear fields and screens…”
How to use this feature:
1. Go to the Worksheet Properties menu by clicking on the worksheet title in the upper right hand corner.
2.Check the ‘Use as home screen’ box in the lower left.